


THC gummies have quickly become a popular choice for cannabis enthusiasts, thanks to their convenience, careful consumption, and long-lasting effects. Unlike smoking or vaping, which produce THC effects almost instantly, edibles offer a gradual release of THC into the bloodstream. This slower absorption leads to a more extended and often more relaxing high, making gummies a preferred option for those seeking sustained effects. However, purchasing THC gummies from dispensaries can be pricey, and the quality of gummies bought from a store is always not consistent.
Making your own THC gummies at home not only saves money but also allows for complete control over the dosage and ingredients. You can customize flavors, adjust the strength to suit your tolerance, and ensure that only high-quality, natural ingredients are used, avoiding artificial additives or preservatives. In this blog, you will know about the step-by-step process of creating THC gummies from scratch, ensuring your homemade treats are not only delicious but also safe, effective, and customized to your preferences.
What You’ll Need: Tools & Ingredients
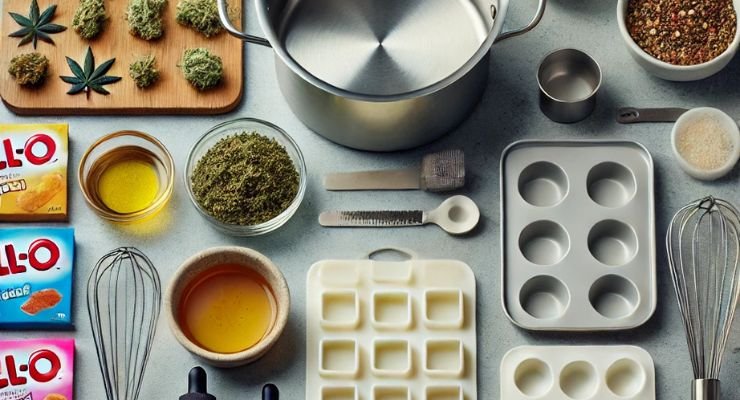
Before making THC gummies, it’s important to gather all the necessary tools and ingredients. So, prepare all the tools and ingredients well in advance to ensure a smooth process that minimizes mistakes and allows you to focus entirely on preparing the perfect batch of gummies. Listed below are all the essential tools, followed by the ingredients that you need to prepare the THC gummies:
Essential Tools
- Silicone gummy molds: These flexible molds are important for shaping your gummies. They come in various shapes and sizes, and it is very easy to remove the finished gummies quickly and easily without breaking them.
- Saucepan: A small to medium-sized saucepan is important to heat your liquid base evenly and ensure the ingredients dissolve properly.
- Whisk (preferably rubber or silicone): A whisk helps you to easily blend ingredients thoroughly and prevents lumps from forming during the mixing process. Silicone or rubber options are gentle on cookware and allow you to blend the mixture properly.
- Measuring cup: Accurate measurements are essential for maintaining consistency in flavor, potency, and texture. A measuring cup is very important as it ensures you get the right quantities every time.
- Dropper or pipette: This tool is very useful for accurately pouring the liquid mixture into molds, especially if you’re using small and different shapes of silicon mold.
- Spatula: Ideal for scraping every last bit of the mixture from the saucepan, reducing waste, and ensuring all ingredients are used efficiently.
- Funnel (optional): A funnel can help pour the gummy mixture into bottles or molds neatly, especially if you’re working with narrow containers or don’t have a steady hand.
Key Ingredients
- ½ cup purified water: This water will act as the liquid base for your gummies. You can also use fruit juice instead of water for added flavor and natural sweetness.
- 1 tablespoon unflavored gelatin: This ingredient gives your gummies their signature chewy texture. For a vegan-friendly option, substitute gelatin with agar-agar, a plant-based gelling agent.
- 1 packet of flavored JELL-O: Adds color, flavor, and additional gelatin to enhance the texture. Choose your favorite flavor for a personalized touch.
- 2 tablespoons honey or agave syrup (optional): Adds natural sweetness to balance the flavors, especially if you’re using unsweetened juice or prefer a sweeter gummy.
- ½ teaspoon citric acid: This will provide you with a slightly tart taste while extending the shelf life of your gummies by preventing microbial growth.
- 1 tablespoon THC tincture: The main component that produces the effects of cannabis is THC tincture. You can adjust the amount based on your desired needs, but make sure you do not overconsume it.
- ⅛ teaspoon salt: A small pinch of salt helps balance the flavors and enhances the sweetness and tartness of your gummies.
- Optional extras: Add vitamin C powder for a nutritional boost or use natural extracts like vanilla, mint, or fruit concentrates for extra flavor customization.
Dosing Your THC Gummies: How to Get It Right

One of the biggest concerns when making THC gummies is ensuring accurate dosing. Unlike smoking or vaping, edibles take longer to kickstart, and consuming too much can result in a strong feeling.
To calculate the potency of your gummies, use this simple formula:
(Total THC in Tincture) ÷ (Total Number of Gummies) = THC per Gummy
For example, if you use a 500 mg THC tincture and make 50 gummies, each gummy will contain 10 mg of THC.
If you want a milder dose, you can reduce the amount of THC tincture or increase the number of gummies. If you are a beginner, then you can start with 5–10 mg per gummy and wait at least 2 hours before consuming more. It’s better to start low and increase gradually to avoid unwanted side effects.
Step-by-Step Recipe for Making THC Gummies
Now that all your ingredients and tools are prepared, let’s dive into the step-by-step process to create your homemade THC gummies.
Step 1: Prepare Your Gummy Molds
Clean your silicone gummy molds well with warm, soapy water and allow them to air dry before cooking. Apply a thin layer of cooking spray or a neutral oil (such as coconut oil) to each mold after it has dried. This procedure makes it much easier to remove the gummies later on and is necessary to keep them from away from sticking to the molds. To prevent grease on the finished gummies, you can also wipe any extra oil with a paper towel.
Step 2: Heat the Liquid Base
Fill a medium saucepan with ½ cup of filtered water (or fruit juice, if you like a flavored base). Setting the pan on low heat is essential since high temperatures might weaken THC’s effects. Heat the liquid slowly, stirring occasionally, until it is warm but not boiling. If using juice, avoid varieties with high acidity, as this can interfere with the gelling process.
Step 3: Add Gelatin and JELL-O
Slowly add 1 tablespoon of unflavored gelatin to the saucepan while stirring constantly once the liquid is heated. This guarantees a smooth texture and avoids clumping. Then, mix in one packet of flavored JELL-O. JELL-O adds flavor, more gelatin, and color. Continue whisking until the mixture is uniformly smooth and both powders have completely dissolved. This stage guarantees that your gummies are lump-free and have an even texture.
Step 4: Add Citric Acid & Salt
Now, stir in ½ teaspoon of citric acid and ⅛ teaspoon of salt. The citric acid adds a pleasant tartness to balance out the sweetness and helps extend shelf life by acting as a preservative. Meanwhile, the salt enhances the overall flavor profile of the gummies, balancing the sweetness and tartness. Continue stirring until these ingredients are mixed properly.
Step 5: Stir in the THC Tincture
To prevent the THC from losing its effectiveness, turn off the heat source. To guarantee an even distribution, add 1 tablespoon of THC tincture and stir well. Each gummy will contain roughly the same amount of THC due to a consistent blend, which simplifies and predicts dosing. Consider the potency of the tincture and, if necessary, modify the dosage to fit your tolerance and desired effect.
Step 6: Pour the Mixture into Molds
Using a dropper or pipette, carefully fill each hole of your prepared gummy molds. This tool helps control the amount you pour and minimizes mess. Once all molds are filled, gently tap the mold tray against the surface to release any trapped air bubbles. This ensures the gummies will have a smooth finish and an even texture without holes or gaps.
Step 7: Let the Gummies Set
Place the filled molds in the refrigerator and let them set for 2-3 hours. If you’re short on time, you can speed up the process by placing the molds in the freezer for about 30 minutes. Once the gummies are firm, carefully pop them out of the molds and store them in an airtight container. Keep them in the refrigerator to maintain their freshness, particularly if they are made with natural ingredients without any preservatives.
Customizing Your THC Gummies

One of the biggest advantages of making THC gummies at home is the ability to customize them to your personal preferences. Unlike store-bought options, you can control every aspect of your gummies, from flavor and sweetness to shape and potency. Here are some creative ways to make your gummies truly unique:
- Swap Water for Fruit Juice: Instead of using plain purified water, you can replace it with fruit juices such as orange, lemon, or berry. This adds natural flavor and slight sweetness to the gummies, making them more enjoyable while also providing additional vitamins and nutrients.
- Use Natural Sweeteners: Instead of relying on refined sugar, try natural alternatives like honey, agave syrup, or maple syrup. These options not only add a unique taste but also offer slight health benefits compared to processed sugars.
- Enhance Flavors with Extracts: Boost the flavor intensity by adding a few drops of extracts like mint, vanilla, lavender, or almond. These natural flavors can complement the cannabis taste and promote the overall experience.
- Make Sour Gummies: When your gummies are completely firm, sprinkle them with a mixture of sugar and citric acid if you enjoy tart treats. This adds a savory punch similar to those of the popular sour candy brands.
- Experiment with Fun Shapes: Using different silicone molds allows you to create gummies in different shapes, such as stars, animals, or hearts. This adds a fun, personalized touch and makes dosing easier with equal sizes of gummies.
Storing Your THC Gummies
Proper storage is essential to maintain the freshness, potency, and texture of your homemade THC gummies. Follow these tips to keep your gummies in top condition:
✔️ Store in an Airtight Container: Exposure to air can cause gummies to dry out and lose their effectiveness over time. Keep them in an airtight container to preserve moisture balance and prevent mold growth. Refrigeration also slows down degradation, maintaining potency for longer.
✔️ Use Silica Gel Packets: Adding silica gel packets to your container helps absorb excess moisture, which keeps the gummies dry and extends their shelf life. Make sure the packets are food-safe and kept away from direct contact with the gummies.
✔️ Label properly: Always label your containers with essential information such as the preparation date, THC dosage per gummy, and ingredients used. This helps with responsible consumption and prevents accidental ingestion by others.
✔️ Freeze for Long-Term Storage: If you plan to store your gummies for more than a few weeks, freeze them individually on a tray before transferring them to an airtight container. This prevents the gummies from sticking together and preserves their potency over time.
🚫 Keep Out of Reach of Children and Pets: Store your THC gummies in a secure place, ideally a locked cabinet or a container with childproof seals, to prevent accidental ingestion.
Conclusion
Making THC gummies at home is both a fun and exciting experience, as it offers complete control over potency, flavors, and ingredients. Unlike store-bought options, homemade gummies allow you to customize each set to your preferences, whether that means adjusting the dosage or experimenting with unique flavors. However, it’s essential to consume these edibles responsibly, especially if you’re new to THC.
Start with a low dose, around 5 to 10 mg, and wait at least 1 to 2 hours to begin the effects before considering another serving, as edibles take longer to kick start than smoking or vaping. Additionally, always store your gummies safely, out of reach of children and pets, and label them clearly to prevent accidental consumption. By following this step-by-step guide, you’ll be able to prepare delicious, potent, and personalized THC gummies that perfectly suit your tastes and needs.